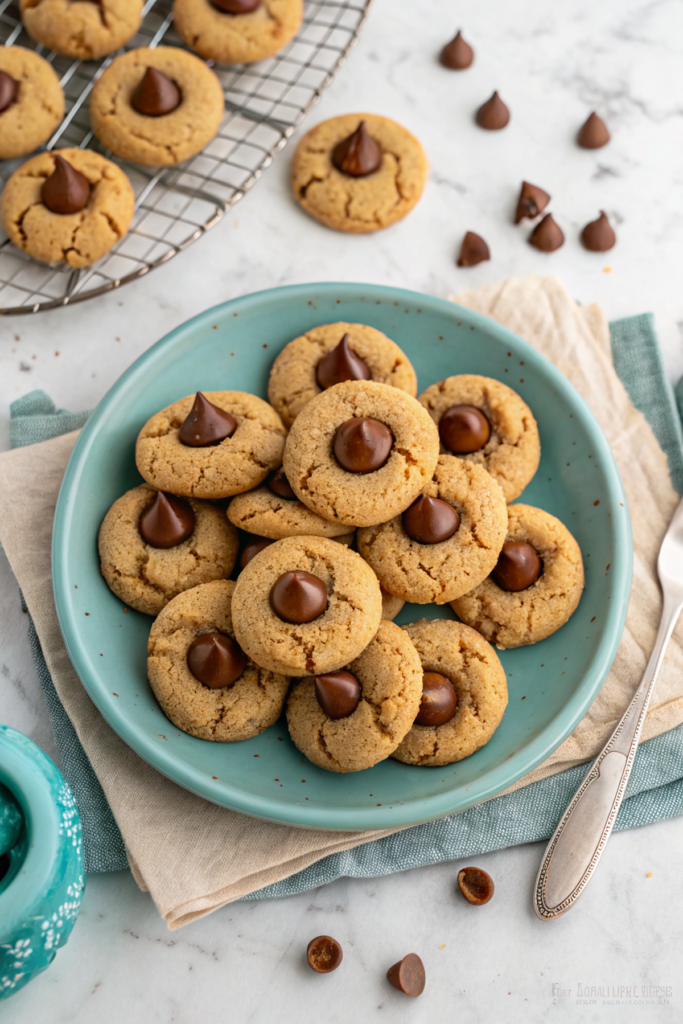
Classic Peanut Butter Blossoms are soft and chewy peanut butter cookies with a sugary, crackled top and finished with a milk chocolate kiss! They’re the perfect go-to cookie for the holiday season and one of the most beloved cookie recipes of all time. These iconic treats combine the irresistible combination of creamy peanut butter and milk chocolate in every bite, with that signature Hershey’s Kiss pressed into the center creating beautiful crackled edges. Whether you’re baking for Christmas cookie exchanges, holiday parties, or simply craving a nostalgic classic, these cookies deliver the perfect balance of sweet and salty, soft and slightly crisp. The sparkling sugar coating adds an extra layer of sweetness and creates that beautiful crackled appearance that makes these cookies instantly recognizable. Adapted from the original 1957 Pillsbury Bake-Off Contest recipe, these peanut butter blossoms have been bringing joy to cookie lovers for generations!
Prep Time: 20 min | Cook Time: 10 min | Chilling Time: 1 hr | Total Time: 1 hr 30 min
Key Ingredients
For the Cookie Dough:
- 1¾ cups all-purpose flour
- 1 teaspoon baking soda
- ½ teaspoon salt
- ½ cup creamy peanut butter
- ½ cup unsalted butter, room temperature
- ½ cup granulated sugar
- ½ cup light brown sugar, lightly packed
- 1 large egg
- 2 tablespoons milk
- 1 teaspoon vanilla extract
For Coating and Topping:
- ½ cup granulated sugar (additional amount for coating cookies)
- 11 oz bag of Hershey’s Kisses (milk chocolate)
Substitution Notes: Natural peanut butter doesn’t work as well—stick with regular creamy peanut butter like Jif or Skippy for best results. Dark chocolate or striped Kisses can replace milk chocolate Kisses for variety. Salted butter can be used if you reduce or omit the added salt.
Step-by-Step Instructions
1. Mix Dry Ingredients In a medium bowl, whisk together the all-purpose flour, baking soda, and salt until evenly combined. Set this bowl aside—you’ll add it to the wet ingredients later.
2. Cream Butter, Peanut Butter, and Sugars Using a hand mixer or stand mixer fitted with the paddle attachment, cream together the creamy peanut butter, room temperature unsalted butter, granulated sugar, and light brown sugar on medium-high speed. Beat for 2 to 3 minutes until the mixture is well blended, light, and fluffy. This step incorporates air for a tender cookie texture.
3. Add Wet Ingredients Add the egg, milk, and vanilla extract to the peanut butter mixture. Beat on medium speed until fully incorporated, scraping down the sides of the bowl as needed to ensure everything is evenly mixed. The mixture should look smooth and creamy.
4. Combine Wet and Dry Reduce the mixer speed to low. Gradually add the dry flour mixture to the wet ingredients, mixing just until completely blended and no streaks of flour remain. Don’t overmix—stop as soon as the dough comes together. The dough will be soft and slightly sticky.
5. Chill the Dough Place the cookie dough in a well-sealed food container or tightly wrap the top of the mixing bowl with plastic wrap. Refrigerate for a minimum of 1 hour. This chilling time firms up the dough, making it easier to handle and helping the cookies maintain their shape during baking. You can chill the dough for up to 24 hours if making ahead.
6. Prepare for Baking After the dough has chilled, line 2 baking sheets with parchment paper or silicone baking mats. Adjust the oven rack to the second level mark (just above center) for even baking. Preheat the oven to 375°F (190°C).
7. Unwrap the Kisses (Pro Tip!) While the oven preheats, unwrap all your Hershey’s Kisses and place them in a bowl. Having them ready to go makes the process much smoother when you need to quickly top the hot cookies. Trust me, this step is a game-changer!
8. Shape and Coat Cookies Place the additional ½ cup of granulated sugar in a small bowl. Using a spoon or cookie scoop, portion out the dough and use your clean hands to shape it into 1-inch balls (about 1 tablespoon of dough each). Roll each ball in the granulated sugar until completely coated. Place the sugar-coated balls about 1½ to 2 inches apart on the prepared baking sheets.
9. First Bake Bake for 7 to 8 minutes. The cookies will puff up and the edges will just start to set, but the centers will still look slightly soft. Remove the baking sheet from the oven—work quickly for this next step!
10. Add the Kisses Immediately place one milk chocolate Kiss in the center of each cookie, pressing down gently but firmly. The pressure will create those beautiful crackly edges around the Kiss—this is the signature look of peanut butter blossoms! The cookies will deflate slightly, which is perfect.
11. Second Bake Return the baking sheet to the oven and bake for 2 minutes longer. This brief additional baking time helps set the cookies around the Kiss and ensures the bottom is fully baked.
12. Cool Properly Cool the cookies on the baking sheet for 5 to 10 minutes—this is crucial for allowing them to firm up without breaking. The chocolate will still be soft during this time. After cooling on the sheet, transfer the cookies to a wire cooling rack to cool completely. The chocolate Kiss will firm up as it cools.
Serving Suggestions
- Holiday Cookie Platter: Arrange alongside sugar cookies, chocolate chip cookies, and other holiday favorites for a colorful variety
- Milk Pairing: Serve with cold milk for dunking—the classic combination that never gets old
- Gift Boxes: Package in festive tins or clear cellophane bags tied with ribbon for beautiful homemade gifts
- Cookie Exchange Star: These are always the first to disappear at cookie swaps—make a double batch!
- Dessert Bar Addition: Include as part of a dessert bar with ice cream, brownies, and other sweet treats
Storage & Make-Ahead Tips
Room Temperature Storage: Store cookies in a tightly sealed airtight container with a slice of bread cut in half. The peanut butter blossoms will absorb moisture from the bread, keeping them soft for much longer. The cookies will last up to a week at room temperature—though I guarantee they won’t last that long!
Freezing Baked Cookies: Freeze fully cooled cookies in a freezer-safe container with parchment paper between layers for up to 3 months. Thaw at room temperature for 30 minutes before serving. The chocolate may develop a slight bloom (whitish coating) but will still taste delicious.
Freezing Cookie Dough: This is the best make-ahead method! Roll the dough into 1-inch balls, but do not coat them in sugar. Place on a wax paper or parchment paper-lined baking sheet and freeze until hard (about 1 to 2 hours). Transfer frozen dough balls to a freezer storage bag and freeze for up to 3 months. When ready to bake, coat the frozen dough balls in sugar and bake for 9 to 11 minutes (do not let them come to room temperature first). Add the chocolate Kiss, then return to the oven for 2 minutes more.
Make-Ahead Instructions: The dough can be made and chilled up to 2 days in advance. You can also shape the dough into balls and refrigerate them on a covered baking sheet, then coat in sugar and bake when ready.
Bread Trick for Softness: Replace the bread slice in your storage container every few days to maintain maximum softness. This old-fashioned trick really works!
Tips & Tricks
Don’t Skip the Chill Time: The 1-hour minimum chill time is essential for cookies that hold their shape and have the perfect texture. Warm dough spreads too much and creates flat, thin cookies instead of the desired thick, chewy texture.
Work Quickly with the Kisses: Have your unwrapped Kisses ready in a bowl before baking. As soon as the cookies come out of the oven after the first bake, you need to work quickly to press the Kisses in while the cookies are still hot and pliable. If the cookies cool too much, they’ll crack when you try to add the Kiss.
Press Kisses Firmly but Gently: You want to press down enough to create those beautiful crackled edges, but not so hard that you flatten the entire cookie. A gentle but confident press is perfect—the cookie will naturally deflate slightly around the Kiss.
Common Mistakes to Avoid
- Using natural or no-stir peanut butter – These separate and have different oil content, creating cookies that spread too much and have grainy texture
- Skipping the chilling time – Unchilled dough spreads excessively, creating flat cookies that lose their shape
- Not unwrapping Kisses ahead of time – Trying to unwrap them while cookies are cooling costs precious seconds and the cookies may become too firm
- Overbaking – These cookies should look slightly underdone after the first 7-8 minutes; they continue cooking during the second bake
- Storing without bread – These cookies dry out faster than most; the bread slice trick is essential for keeping them soft
Chef’s Advice
Flavor Variations:
- Use dark chocolate Kisses for a more sophisticated, less sweet flavor
- Try peanut butter Kisses or Hershey’s Hugs (striped) for a different look
- Add ½ cup mini chocolate chips to the dough for extra chocolate throughout
- Mix ½ cup chopped peanuts into the dough for added crunch
- Use crunchy peanut butter instead of creamy for more peanut texture
Ingredient Substitutions:
- Almond butter can replace peanut butter for those with peanut allergies (though these won’t be “peanut butter” blossoms anymore!)
- Coconut oil can substitute for butter in a dairy-free version
- Dairy-free chocolate Kisses or chocolate chips pressed into the center work for dairy-free diets
- Light brown sugar can replace dark brown sugar with minimal difference
Presentation Ideas:
- Arrange in concentric circles on a platter for an impressive display
- Package in clear treat bags with festive ribbon for party favors
- Create a cookie tower by stacking them on a tiered stand
- Serve on holiday-themed plates that complement the silver Kiss wrappers
- Add a dusting of powdered sugar around the edges for a snowy effect
Size Variations: For mini peanut butter blossoms, use ½ tablespoon of dough and mini Hershey’s Kisses. Bake for 6 minutes, add Kiss, then bake 2 minutes more. For jumbo cookies, use 2 tablespoons of dough and bake for 10 minutes, add Kiss, then bake 2 minutes more.
History and Cultural Significance
Peanut Butter Blossoms have a fascinating origin story rooted in American baking tradition. The original recipe was created and entered into the 9th annual Pillsbury Bake-Off Contest in 1957 by a homemaker named Freda Smith from Ohio. While her recipe didn’t win the grand prize, it became one of the most beloved and enduring recipes to ever come from the competition.
The timing was perfect—Hershey’s Kisses, introduced in 1907, had become a household staple by the 1950s. The post-World War II era saw a boom in creative home baking, with homemakers experimenting with convenience products and creating new classics. The combination of peanut butter (which had gained popularity during WWII as a protein source) and chocolate was already a favorite American flavor pairing.
What made Peanut Butter Blossoms special was their visual appeal and the clever use of a nationally recognized candy as both decoration and flavor component. The recipe spread rapidly through church cookbooks, community recipe exchanges, and word of mouth. By the 1960s and 1970s, these cookies had become a staple at holiday cookie exchanges and Christmas parties across America.
The recipe has been adapted countless times over the decades, but the core concept remains unchanged—soft peanut butter cookies crowned with a chocolate Kiss. They represent a uniquely American approach to baking: practical, visually appealing, and combining beloved commercial products with homemade goodness.
Today, Peanut Butter Blossoms remain one of the most searched and baked cookie recipes, particularly during the holiday season. They’ve achieved true classic status, passed down through generations and appearing on cookie platters from coast to coast.
Final Thoughts
These Classic Peanut Butter Blossoms are proof that some recipes achieve perfection and never need changing. For over 65 years, home bakers have been making these cookies with minimal variations because the original formula got it exactly right. The combination of soft, chewy peanut butter cookie with that iconic chocolate Kiss creates a taste and texture experience that’s simply unbeatable.
Whether you’re making them for the first time or continuing a family tradition, these cookies never disappoint. They’re easy enough for beginner bakers yet impressive enough to be the star of any cookie platter. The sugary coating, crackled edges, and shiny chocolate top make them as beautiful as they are delicious.
So gather your ingredients, unwrap those Kisses, and get ready to create a batch of cookie magic. These Peanut Butter Blossoms are about to become the most requested recipe in your collection. Here’s to continuing this sweet American tradition—one chocolate-topped cookie at a time!
Nutrition Information
| Serving Size | Calories | Protein | Carbs | Fat | Fiber | Sugar |
|---|---|---|---|---|---|---|
| 1 cookie | 107 | 2g | 14g | 5g | 0.4g | 10g |
Additional Nutrition Details: Saturated Fat 3g | Polyunsaturated Fat 0.4g | Monounsaturated Fat 1g | Trans Fat 0.1g | Cholesterol 10mg | Sodium 66mg | Potassium 26mg | Vitamin A 65 IU | Calcium 18mg | Iron 0.4mg
Disclaimer: Nutrition information is estimated using standard online calculation tools and may vary based on ingredients and preparation methods. For accurate dietary advice, consult a qualified nutrition professional.
Course: Cookies, Dessert | Cuisine: American | Author: Jennifer | Yield: 48 cookies | Servings: 48
Recipe adapted from the Original 1957 Bake-Off Contest Recipe