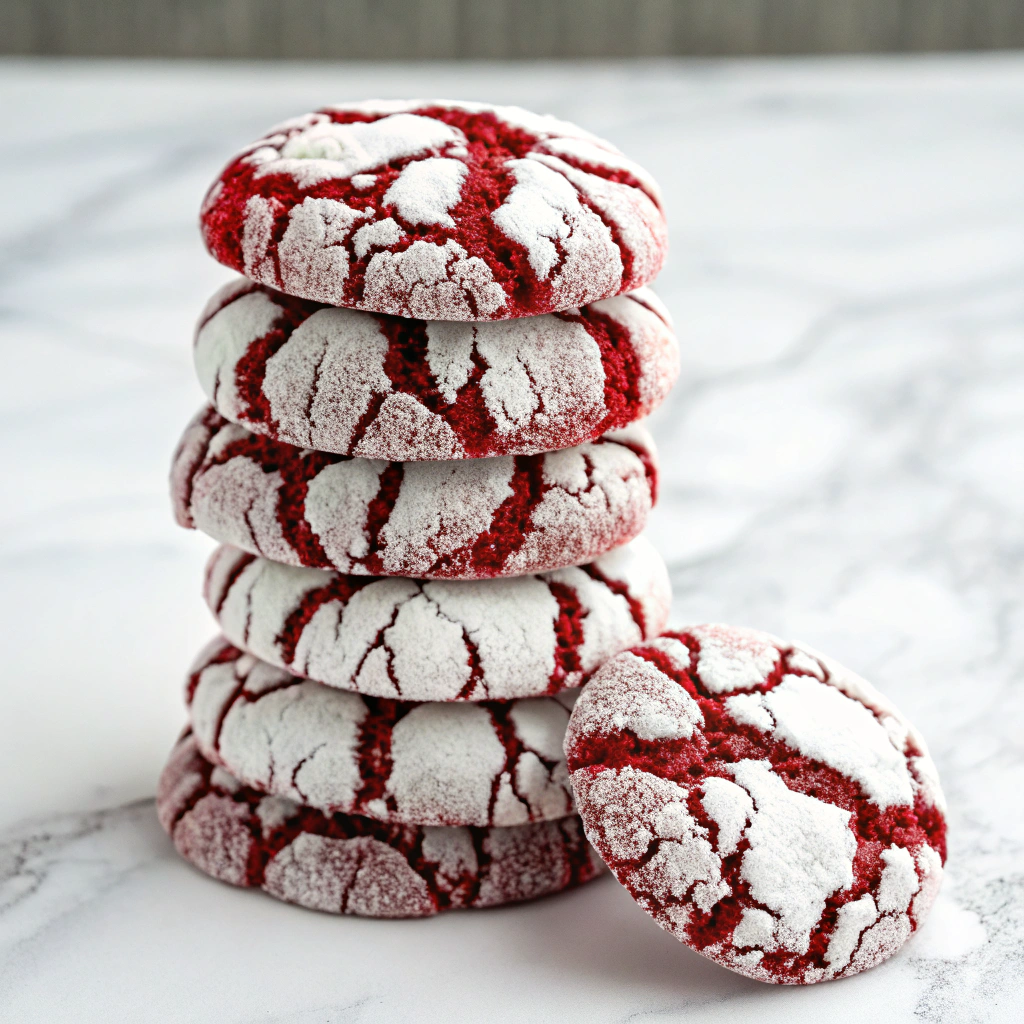
There’s something magical about red velvet crinkle cookies that captures the spirit of the holidays perfectly. These soft, chewy beauties combine everything we love about classic red velvet cake with the irresistible charm of traditional crinkle cookies. The deep crimson color peeking through snowy powdered sugar creates a stunning contrast that makes these cookies the star of any dessert table. From Emma’s Cake Studio comes this easy red velvet cookie recipe that’s become a festive favorite for good reason. Whether you’re building a Christmas cookie platter, looking for impressive homemade gifts, or simply want to add eye-catching treats to your December celebrations, these cookies deliver on both looks and flavor. The best part? They’re surprisingly simple to make, yet they look like they came from a professional bakery.
Prep Time: 15 min | Cook Time: 12 min | Chilling Time: 30 min | Total Time: 57 min
Key Ingredients
For the Cookie Dough:
- 1½ cups all-purpose flour
- ½ cup unsweetened cocoa powder
- 1 teaspoon baking powder
- ¼ teaspoon salt
- ½ cup unsalted butter, softened
- 1 cup granulated sugar
- 2 large eggs
- 1 teaspoon vanilla extract
- 1 tablespoon red food coloring (gel food coloring works best)
For Coating:
- ½ cup powdered sugar (also called confectioners’ sugar)
Substitution Notes: Gel food coloring creates more vibrant color than liquid, but liquid works too—you may just need a bit more. For a natural alternative, try beet powder, though the color will be less vibrant.
Step-by-Step Instructions
1. Preheat the Oven Set your oven to 350°F (175°C). Line two baking sheets with parchment paper or silicone baking mats. This prevents sticking and ensures even baking.
2. Mix Dry Ingredients In a medium bowl, whisk together the flour, cocoa powder, baking powder, and salt until completely combined with no lumps. This ensures even distribution of the cocoa and leavening throughout your cookies.
3. Cream Butter and Sugar In a large mixing bowl, beat the softened butter and granulated sugar together using an electric mixer on medium speed for 2 to 3 minutes. The mixture should become light, fluffy, and pale in color. This step incorporates air for softer cookies.
4. Add Eggs and Coloring Add the eggs one at a time, beating well after each addition until fully incorporated. This prevents the mixture from curdling. Stir in the vanilla extract and red food coloring, mixing until the batter is evenly tinted with that gorgeous red velvet hue.
5. Combine Mixtures Gradually add the dry ingredients to the wet mixture in two or three additions, stirring with a spatula or wooden spoon just until no streaks of flour remain. Don’t overmix—this keeps your cookies tender. The dough will be soft and slightly sticky, which is exactly what you want.
6. Chill the Dough Cover the bowl tightly with plastic wrap and refrigerate for at least 30 minutes. This crucial step firms up the dough, making it easier to handle and helping the cookies maintain their shape during baking while developing deeper flavor.
7. Form and Coat Dough Balls Once chilled, use a tablespoon or cookie scoop to portion out the dough. Roll each portion into a 1-inch ball between your palms. Place the powdered sugar in a small bowl and roll each ball generously, ensuring it’s completely coated. The thick coating is key to achieving those beautiful cracks.
8. Bake Arrange the coated dough balls on your prepared baking sheets, spacing them about 2 inches apart to allow for spreading. Bake for 10 to 12 minutes. The cookies are done when the edges are set but the centers still look slightly soft and underbaked. They’ll continue to firm up as they cool.
9. Cool Let the cookies rest on the baking sheets for 3 to 5 minutes—this prevents them from breaking apart. Then carefully transfer them to a wire rack to cool completely. The cracks will become more pronounced as they cool.
Serving Suggestions
- Holiday Cookie Platter: Arrange on a festive platter alongside gingerbread cookies, sugar cookies, and peppermint bark for a stunning Christmas display
- Gift Boxes: Stack in clear cellophane bags tied with red ribbon for beautiful homemade gifts that friends and family will treasure
- Dessert Table Centerpiece: Pile high on a cake stand for a dramatic presentation at holiday parties or potlucks
- Ice Cream Sandwiches: Sandwich vanilla or cream cheese ice cream between two cookies for an elegant frozen treat
- Coffee & Tea Pairing: Serve warm with hot chocolate, coffee, or chai tea for a cozy afternoon treat
Storage & Make-Ahead Tips
Room Temperature Storage: Store completely cooled cookies in an airtight container at room temperature for up to 5 days. Place parchment paper between layers to prevent sticking and preserve that powdered sugar coating.
Freezing Baked Cookies: These cookies freeze beautifully! Place in a freezer-safe container with parchment between layers and freeze for up to 3 months. Thaw at room temperature for about 30 minutes before serving. You may want to dust with a bit more powdered sugar after thawing.
Freezing Cookie Dough: Roll the dough into balls and freeze on a baking sheet until solid (about 1 hour), then transfer to a freezer bag for up to 3 months. When ready to bake, roll frozen dough balls in powdered sugar and bake directly from frozen, adding 1-2 extra minutes to the baking time.
Make-Ahead Instructions: Prepare the dough up to 2 days ahead and keep it refrigerated in a covered bowl. When ready to bake, let it sit at room temperature for 5-10 minutes if too firm to scoop, then proceed with rolling and coating.
Tips & Tricks
Don’t Skimp on the Powdered Sugar: A generous coating is essential for achieving those dramatic cracks and the signature crinkle appearance. Don’t be shy—really roll those dough balls around until they’re completely white.
Chill Time is Non-Negotiable: Skipping or shortening the chilling time will result in flat, spread-out cookies instead of thick, crackly ones. If you’re short on time, you can speed up chilling by placing the bowl in the freezer for 15 minutes instead.
Watch the Baking Time Carefully: These cookies continue to bake on the hot pan after removal from the oven. Slightly underbaking ensures soft, chewy centers rather than dry, cake-like cookies. When in doubt, err on the side of less time.
Common Mistakes to Avoid
- Using cold butter – Butter must be softened to room temperature for proper creaming; cold butter won’t incorporate air and results in dense cookies
- Overbaking – Removing cookies when they still look slightly underdone in the center is key; overbaked red velvet cookies become dry and lose their signature chewiness
- Skipping the chill time – Warm dough spreads too much in the oven, resulting in flat cookies without the thick, crackly texture that makes crinkle cookies special
- Not coating thoroughly in powdered sugar – A light dusting isn’t enough; you need a thick, generous coating for dramatic cracks to show through
- Rolling dough with wet hands – Wet hands cause the powdered sugar to dissolve immediately; keep hands dry or lightly flour them instead
Chef’s Advice
Flavor Variations:
- Add ½ teaspoon of espresso powder to intensify the chocolate flavor without making them taste like coffee
- Mix in ½ cup of white chocolate chips to the dough for extra sweetness and visual appeal
- Add 1 teaspoon of peppermint extract along with the vanilla for a festive mint twist
- Fold in ½ cup of finely chopped pecans or walnuts for added texture and nuttiness
Ingredient Substitutions:
- Cream cheese can replace 2 tablespoons of butter for a tangier, more authentic red velvet flavor
- Dutch-process cocoa powder creates a deeper, richer chocolate taste than natural cocoa
- For a gluten-free version, use a 1:1 gluten-free flour blend (though texture may vary slightly)
- Vegan butter and flax eggs can be used for a plant-based version
Presentation Ideas:
- Dust with additional powdered sugar just before serving for an extra snowy look
- Drizzle with melted white chocolate in a crosshatch pattern for elegant decoration
- Stack cookies in a clear glass jar tied with festive ribbon for stunning gift presentation
- Arrange in a wreath shape on a round platter with fresh holly or evergreen sprigs for holiday serving
Achieving Perfect Cracks: Roll dough balls in granulated sugar first, then coat generously in powdered sugar for even more dramatic cracking. The contrast between the two sugars creates extra-deep fissures.
History and Cultural Significance
Red velvet’s origins are debated, but most food historians trace it to the 1800s when “velvet cake” recipes—named for their fine, tender crumb—first appeared in American cookbooks. The distinctive red color originally came from a chemical reaction between natural cocoa powder and acidic ingredients like buttermilk and vinegar, which gave the cake a reddish-brown hue.
The vibrant red color we know today became popular in the 1930s and 1940s, particularly when the Adams Extract Company began marketing red food coloring alongside their “Original Red Velvet Cake” recipe. The cake gained iconic status at the Waldorf-Astoria Hotel in New York City, cementing its place in American dessert culture.
Crinkle cookies, on the other hand, have roots in German and Eastern European baking traditions, where powdered sugar-coated cookies were common. The chocolate crinkle cookie became popular in America during the mid-20th century, appearing in community cookbooks and becoming a holiday staple.
Red Velvet Crinkle Cookies represent a modern fusion of these two beloved American desserts. They’ve become particularly popular in the 2010s and 2020s with the rise of food blogging and Instagram, where their photogenic appearance—that striking red-and-white contrast—makes them social media favorites and holiday must-bakes.
Final Thoughts
Red Velvet Crinkle Cookies are the perfect marriage of two classic desserts, bringing together the sophisticated flavor of red velvet with the festive charm of crinkle cookies. These soft, chewy beauties aren’t just delicious—they’re conversation starters, photo opportunities, and the kind of treat people remember long after the holidays are over.
Whether you’re a seasoned baker or just starting your holiday baking journey, this recipe is approachable and forgiving while delivering impressive, bakery-worthy results. The contrast between the deep red cookie and snowy powdered sugar coating makes them absolutely stunning on any dessert spread, and they taste even better than they look.
So preheat that oven, grab your red food coloring, and get ready to create cookies that’ll have everyone asking for the recipe. These red velvet crinkle cookies from Emma’s Cake Studio are about to become your new holiday tradition—one delicious, eye-catching batch at a time!
Nutrition Information
| Serving Size | Calories | Protein | Carbs | Fat | Fiber | Sugar |
|---|---|---|---|---|---|---|
| 1 cookie (1/24 of recipe) | 95 | 1g | 15g | 4g | 0.5g | 11g |
Disclaimer: Nutrition information is estimated using standard online calculation tools and may vary based on ingredients and preparation methods. For accurate dietary advice, consult a qualified nutrition professional.
Yield: Approximately 24 cookies | Servings: 24