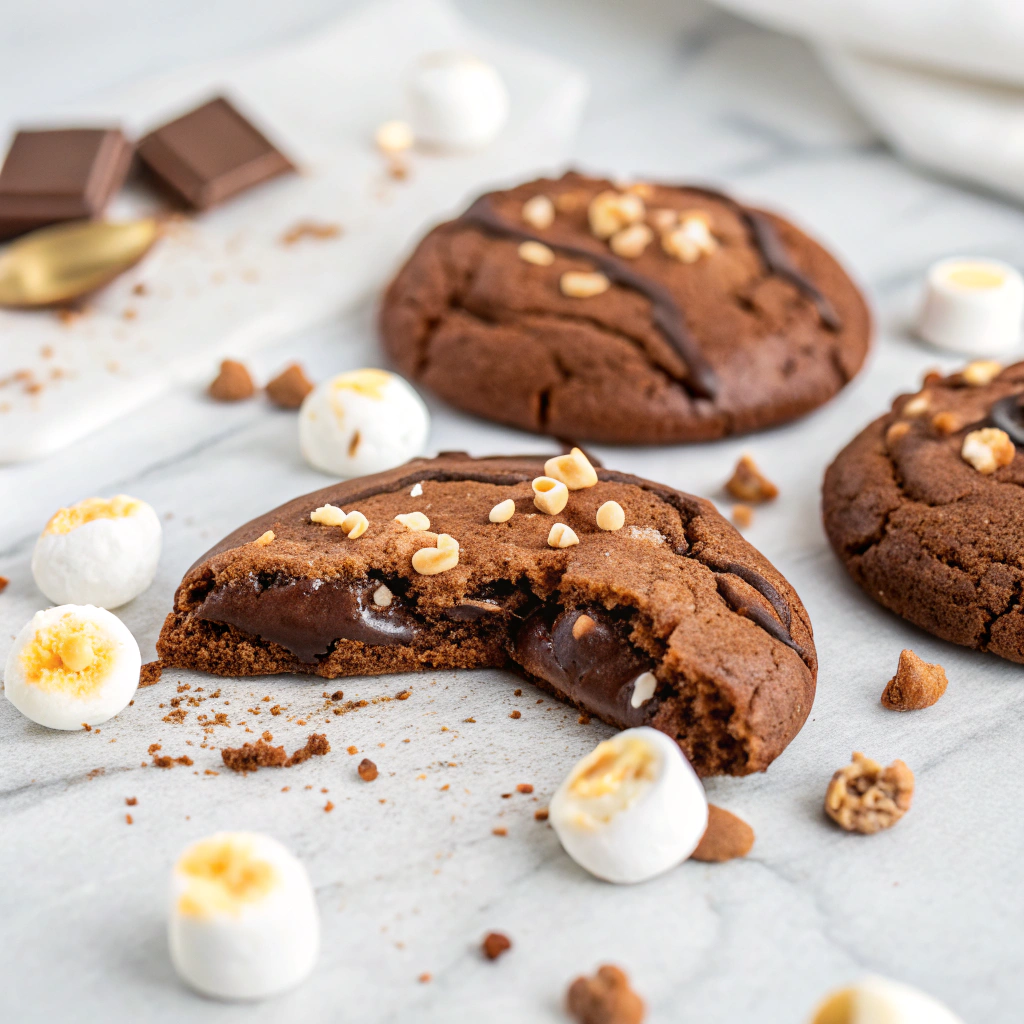
Imagine everything you love about a cozy mug of hot chocolate transformed into a warm, chewy cookie. These Hot Chocolate Cookies deliver exactly that—rich chocolate flavor, melty chocolate chips, and pillowy mini marshmallows all baked into one irresistible treat. Perfect for cold winter evenings, holiday cookie exchanges, or anytime you’re craving that comforting hot cocoa experience in cookie form, these cookies are guaranteed to become a family favorite. The combination of deep cocoa flavor with pockets of melted chocolate and toasted marshmallows creates a texture and taste that’s absolutely magical. Whether you’re baking for kids who’ll squeal with delight at the marshmallows or adults seeking a nostalgic treat, these cookies hit all the right notes. They’re easy enough for beginner bakers yet impressive enough to wow any crowd.
Prep Time: 15 min | Cook Time: 10 min | Total Time: 25 min
Key Ingredients
For the Cookie Dough:
- 1 cup (225 g) unsalted butter, softened (Recommended: Kerrygold Grass-Fed Irish Butter for rich, creamy flavor)
- 1 cup (200 g) brown sugar
- ½ cup (100 g) granulated sugar
- 2 large eggs
- 2 teaspoons vanilla extract
- 2 cups (250 g) all-purpose flour (Recommended: King Arthur All-Purpose Flour; Gluten-Free Option: Bob’s Red Mill 1-to-1 Gluten Free Flour)
- ¾ cup (75 g) unsweetened cocoa powder
- 1 teaspoon baking soda
- ½ teaspoon salt
For the Mix-Ins:
- 1 cup (170 g) chocolate chips or chunks
- 1 cup mini marshmallows
Substitution Notes: Dark chocolate chips create a more sophisticated flavor, while milk chocolate chips make them sweeter. You can also use a combination of both. Regular-sized marshmallows can be cut into quarters if mini marshmallows aren’t available.
Step-by-Step Instructions
1. Preheat and Prepare Preheat your oven to 350°F (175°C). Line a baking sheet with parchment paper or a silicone baking mat. This prevents sticking and ensures easy cleanup. If baking multiple batches, prepare a second baking sheet to keep the process moving smoothly.
2. Cream the Butter and Sugars In a large mixing bowl, cream together the softened butter, brown sugar, and granulated sugar using an electric mixer on medium speed. Beat for 2 to 3 minutes until the mixture becomes light, fluffy, and pale in color. The brown sugar adds moisture and creates that perfect chewy texture.
3. Add Wet Ingredients Add the eggs one at a time, beating well after each addition until fully incorporated. Mix in the vanilla extract until smooth. The mixture should look creamy and homogeneous at this point.
4. Combine Dry Ingredients In a separate bowl, whisk together the flour, cocoa powder, baking soda, and salt until no lumps remain. This ensures the cocoa powder and leavening agent are evenly distributed throughout the dough for consistent chocolate flavor in every bite.
5. Mix Wet and Dry Gradually add the dry ingredient mixture to the wet ingredients, mixing on low speed or stirring by hand just until combined. Don’t overmix—stop as soon as you no longer see streaks of flour. Overmixing can result in tough, cakey cookies rather than soft, chewy ones.
6. Fold in Mix-Ins Gently fold in the chocolate chips and mini marshmallows using a spatula or wooden spoon. Distribute them evenly throughout the dough so every cookie gets a good amount of both. The dough will be thick and somewhat sticky—this is perfect.
7. Scoop the Dough Using a tablespoon or cookie scoop (approximately 1.5 to 2 tablespoons of dough), portion out rounds onto your prepared baking sheet. Leave about 2 inches of space between each cookie to allow for spreading during baking. For more uniform cookies, roll the dough briefly between your palms.
8. Bake to Perfection Bake for 9 to 11 minutes, until the edges are set but the centers still look slightly soft and underbaked. The cookies will continue to cook on the hot baking sheet after removal from the oven. Don’t overbake—you want gooey centers!
9. Cool Let the cookies cool on the baking sheet for 3 to 5 minutes to set up. They’ll be very delicate when hot. Then carefully transfer them to a wire cooling rack to cool completely, or enjoy them warm for the ultimate melty marshmallow and chocolate experience.
Serving Suggestions
- Hot Chocolate Pairing: Serve warm cookies alongside actual hot chocolate for the ultimate cozy winter treat—double the chocolate, double the comfort
- Ice Cream Sandwich: Use two cookies to sandwich vanilla, peppermint, or chocolate ice cream for an indulgent dessert
- S’mores Style: Add a piece of milk chocolate and an extra marshmallow on top halfway through baking for a s’mores-inspired variation
- Coffee Break: Pair with strong coffee or a latte for an afternoon pick-me-up that combines two beloved flavors
- Holiday Gift Boxes: Package in clear cellophane bags with festive ribbon for homemade gifts that look bakery-quality
Storage & Make-Ahead Tips
Room Temperature Storage: Store cooled cookies in an airtight container at room temperature for up to 5 days. Place a slice of bread in the container to help maintain softness—the cookies will absorb moisture from the bread.
Freezing Baked Cookies: These cookies freeze beautifully! Let them cool completely, then layer in a freezer-safe container with parchment paper between layers. Freeze for up to 3 months. Thaw at room temperature for 30 minutes or warm briefly in a 300°F oven for 5 minutes to restore that fresh-baked texture.
Freezing Cookie Dough: Scoop the dough into balls, place on a baking sheet, and freeze until solid (about 1 hour). Transfer frozen dough balls to a freezer bag and freeze for up to 3 months. Bake directly from frozen, adding 1 to 2 extra minutes to the baking time.
Make-Ahead Instructions: Prepare the dough up to 2 days in advance and store covered in the refrigerator. Let it sit at room temperature for 15 to 20 minutes before scooping if it becomes too firm. You can also scoop the dough balls and refrigerate them on a covered baking sheet, then bake as needed for fresh cookies anytime.
Reheating Tip: Warm refrigerated cookies in the microwave for 10 to 15 seconds to revive that gooey, fresh-baked texture with melty marshmallows and chocolate.
Tips & Tricks
Don’t Overbake: The key to soft, chewy hot chocolate cookies is pulling them from the oven when they still look slightly underdone in the center. They’ll appear puffy and soft but will firm up as they cool. Overbaking creates dry, cakey cookies instead of gooey ones.
Use Quality Cocoa Powder: Since chocolate is the star flavor here, invest in good-quality unsweetened cocoa powder. Dutch-process cocoa creates a darker, more intense chocolate flavor, while natural cocoa powder is lighter and slightly more acidic. Both work well.
Reserve Some Marshmallows: For a more impressive presentation, press a few extra mini marshmallows into the tops of the cookies immediately after removing them from the oven. They’ll get slightly toasted and melty, creating that authentic hot chocolate look.
Common Mistakes to Avoid
- Using cold butter – Butter should be softened to room temperature (still holds its shape but yields to gentle pressure); cold butter won’t cream properly
- Overbaking – These cookies should look slightly underdone when removed from the oven; they continue cooking on the hot pan
- Adding marshmallows too early – Make sure the marshmallows are added last and folded in gently; mixing them too vigorously can break them down
- Skipping the parchment paper – Even greased pans can cause sticking; parchment ensures easy removal and cleanup
- Crowding the baking sheet – Cookies need space to spread; too close together and they’ll merge into one giant cookie
Chef’s Advice
Flavor Variations:
- Add ½ teaspoon peppermint extract along with the vanilla for hot chocolate with a minty twist
- Mix in 1 cup of crushed candy canes or peppermint candies for festive holiday cookies
- Sprinkle sea salt flakes on top before baking for a sweet-salty contrast
- Stir in ½ cup of white chocolate chips along with the regular chocolate chips for extra decadence
- Add 1 teaspoon instant espresso powder to the dry ingredients to deepen the chocolate flavor
Ingredient Substitutions:
- Salted butter can replace unsalted butter—just omit or reduce the added salt to ¼ teaspoon
- Coconut sugar can substitute for brown sugar for a slightly different caramel note
- Dark cocoa powder creates a richer, more intense chocolate flavor
- Vegan butter and flax eggs (1 tablespoon ground flaxseed + 3 tablespoons water per egg) work for a vegan version
Presentation Ideas:
- Dust cooled cookies with powdered sugar for a snowy appearance
- Drizzle with melted white chocolate to mimic whipped cream on hot chocolate
- Top each cookie with a halved regular marshmallow before baking for bakery-style presentation
- Serve on a platter with mini marshmallows scattered around for visual appeal
- Package in mason jars with a ribbon and a hot chocolate packet for creative gifting
Size Variations: For giant bakery-style cookies, use ¼ cup of dough per cookie and bake for 12 to 14 minutes. For mini cookies perfect for parties, use 1 tablespoon of dough and bake for 7 to 8 minutes.
History and Cultural Significance
Hot chocolate, or hot cocoa, has ancient roots dating back to the Mayans and Aztecs, who consumed chocolate as a bitter ceremonial beverage. When Spanish explorers brought chocolate to Europe in the 16th century, sugar was added, transforming it into the sweet treat we know today. By the 17th century, hot chocolate houses became fashionable gathering places in London and Paris, rivaling coffee houses in popularity.
The addition of marshmallows to hot chocolate is a more recent American innovation. Marshmallows themselves have evolved from a medicinal confection made from marshmallow plant root in ancient Egypt to the sugar-based treat we enjoy today. The pairing of hot chocolate and marshmallows became popular in the early 20th century, creating an iconic combination synonymous with winter comfort.
Hot Chocolate Cookies represent the modern trend of translating beloved beverages and flavor combinations into baked goods. This cookie-fication trend has given us everything from espresso cookies to chai-spiced treats, allowing people to enjoy their favorite drink flavors in portable, shareable form. The cookies capture the essence of winter coziness and childhood nostalgia, making them particularly popular during the holiday season.
The use of mini marshmallows in cookies specifically became trendy in the 2010s with the rise of “loaded” cookies on food blogs and Pinterest. These over-the-top treats reflect our collective love of maximalist desserts that pack multiple textures and flavors into every bite.
Final Thoughts
These Hot Chocolate Cookies are pure comfort in cookie form. They deliver everything you love about a mug of hot chocolate—rich chocolate flavor, melty sweetness, and those delightful marshmallows—in a soft, chewy package you can hold in your hand. Whether you’re baking them on a snowy weekend, bringing them to a cookie exchange, or making them as an after-school treat, they never fail to bring smiles.
The best part? They’re incredibly easy to make with straightforward ingredients you likely already have in your pantry. No special equipment or advanced techniques required—just mix, scoop, bake, and enjoy. The hardest part is waiting for them to cool enough to eat (though we won’t judge if you sneak one while it’s still warm and gooey).
So preheat that oven, grab your mixing bowls, and get ready to transform your kitchen into a cozy hot chocolate haven. These cookies are about to become your new cold-weather favorite. Trust me, once you try them, you’ll be making batch after batch all winter long!
Nutrition Information
| Serving Size | Calories | Protein | Carbs | Fat | Fiber | Sugar |
|---|---|---|---|---|---|---|
| 1 cookie (based on 36 cookies) | 125 | 2g | 17g | 6g | 1g | 11g |
Disclaimer: Nutrition information is estimated using standard online calculation tools and may vary based on ingredients and preparation methods. For accurate dietary advice, consult a qualified nutrition professional.
Yield: Approximately 36 cookies | Servings: 36