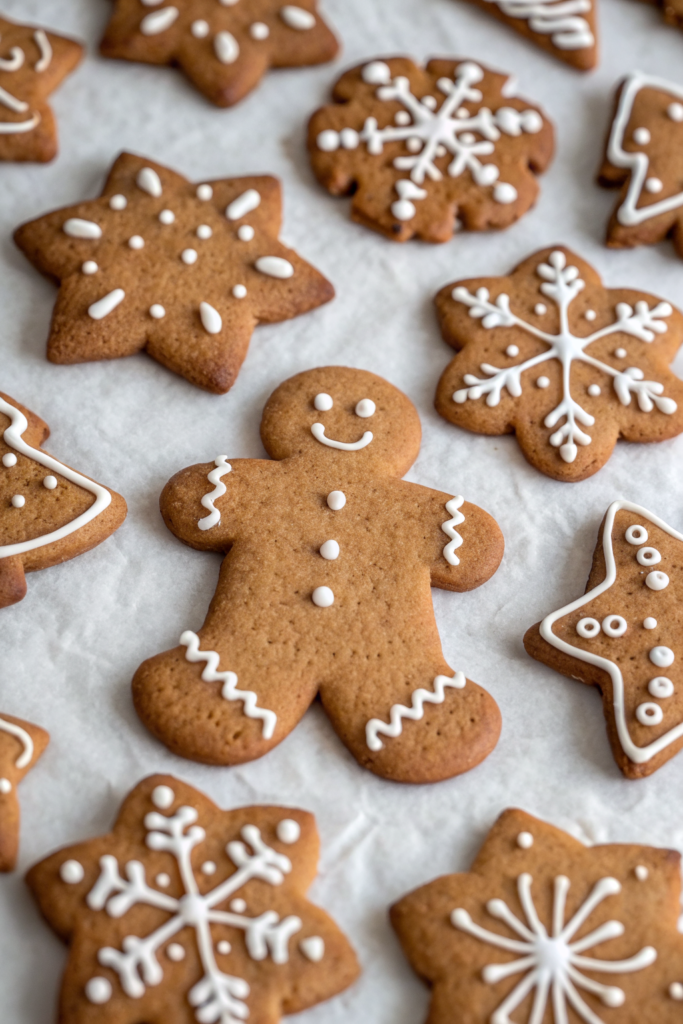
These Soft and Chewy Gingerbread Cookies are the ultimate holiday classic—thick, tender, and full of warm spice that fills your kitchen with the nostalgic aroma of Christmas. Made with rich molasses, brown sugar, and a secret ingredient (apple cider vinegar!) that guarantees incredible softness, this tried-and-true recipe creates dough that holds its shape perfectly for decorating. Whether you’re making gingerbread men, stars, houses, or any festive shape your heart desires, these cookies deliver consistently beautiful results every single time. The combination of ginger, cinnamon, allspice, cloves, and nutmeg creates that iconic gingerbread flavor we all crave during the holidays. Unlike crispy gingerbread, these cookies stay wonderfully soft and chewy for days, making them perfect for decorating parties, cookie exchanges, or simply enjoying with a cup of hot cocoa. This is a timeless recipe that delivers the best gingerbread cookies you’ll ever make!
Prep Time: 25 min | Cook Time: 10 min | Chill Time: 3 hrs | Total Time: 3 hrs 35 min
Equipment Needed
- Mixing bowls (large and medium)
- Electric mixer (stand or hand mixer)
- Whisk
- Rolling pin
- Cookie cutters (gingerbread men, stars, hearts, or any shapes you prefer)
- Baking sheet
- Parchment paper or silicone baking mats
- Wire cooling rack
Key Ingredients
For the Cookie Dough:
- 1 cup unsalted butter, softened
- 1 cup light brown sugar, packed
- 1 large egg, at room temperature
- 1 cup molasses (dark, not blackstrap)
- 1 tablespoon apple cider vinegar (or white wine vinegar)
- 2 teaspoons vanilla extract
- 5 cups all-purpose flour
- 1 teaspoon baking soda
- ½ teaspoon salt
For the Spice Blend:
- 1 tablespoon ground ginger
- 1 tablespoon ground cinnamon
- ½ teaspoon ground allspice
- ½ teaspoon ground cloves
- ¼ teaspoon ground nutmeg
For Simple Icing (Optional):
- 2 cups powdered sugar
- 1 to 2 tablespoons milk or lemon juice
Substitution Notes: Dark molasses creates the deepest flavor; avoid blackstrap as it’s too bitter. White vinegar works if you don’t have apple cider vinegar. Fresh spices make a huge difference—if yours are over a year old, consider replacing them for the best flavor.
Step-by-Step Instructions
1. Cream Butter and Sugar In a large mixing bowl, cream together the softened butter and packed brown sugar using an electric mixer on medium speed. Beat for about 2 minutes until the mixture becomes smooth and well combined. It doesn’t need to be as fluffy as traditional cookies—just evenly mixed.
2. Add Wet Ingredients Add the room-temperature egg, molasses, apple cider vinegar, and vanilla extract to the butter mixture. Mix on low speed until just combined and the mixture looks uniform. Don’t overmix—you just want everything incorporated. The vinegar is your secret weapon for ultra-soft cookies that stay tender for days!
3. Combine Dry Ingredients In a separate medium bowl, whisk together the flour, baking soda, salt, ground ginger, ground cinnamon, ground allspice, ground cloves, and ground nutmeg. Whisk thoroughly until the spices are evenly distributed throughout the flour—this ensures every cookie has consistent flavor.
4. Mix Wet and Dry Gradually add the dry ingredient mixture to the wet ingredients, mixing on low speed. Add about one cup at a time, allowing each addition to mostly incorporate before adding more. Mix just until a soft dough forms and no streaks of flour remain. The dough will be slightly sticky and very aromatic. Avoid overmixing, which can develop too much gluten and create tough cookies.
5. Chill the Dough (Essential Step!) Cover the bowl tightly with plastic wrap or transfer the dough to an airtight container. Refrigerate for at least 3 hours, or up to overnight (24 hours). This step is absolutely essential—it firms up the dough so it’s easy to roll out and helps the cookies hold their shape during baking. Don’t skip or shorten this step!
6. Preheat and Prepare When ready to bake, preheat your oven to 350°F (175°C). Line your baking sheets with parchment paper or silicone baking mats. Prepare your work surface by lightly flouring it—you’ll roll the dough directly on this surface.
7. Roll and Cut Divide the chilled dough in half, keeping one half refrigerated while you work with the other. On a lightly floured surface, roll out the dough to ¼-inch thickness for perfectly thick, soft cookies. Use cookie cutters to cut into your desired shapes—gingerbread men, stars, trees, whatever makes you happy! Place cut cookies on the prepared baking sheets, spacing them about 1 inch apart. They don’t spread much, so you can fit quite a few per sheet.
8. Bake to Perfection Bake medium-sized cookies (3 to 4 inches) for 8 to 10 minutes, or larger cookies (5 to 6 inches) for 12 to 14 minutes. The cookies are done when the surface springs back slightly when gently touched—they should look set but not browned. Don’t overbake if you want soft, chewy cookies! They’ll look slightly underdone, which is perfect.
9. Cool Properly Let the cookies cool on the baking sheet for 2 minutes to set up—they’ll be very soft when hot. Then carefully transfer them to a wire cooling rack to cool completely before decorating. They need to be completely cool or the icing will melt.
10. Decorate (Optional) Once completely cooled, decorate with simple icing or royal icing. For simple icing, mix 2 cups powdered sugar with 1 to 2 tablespoons of milk or lemon juice, adding liquid gradually until you reach a thick but pipeable consistency. Transfer to a piping bag or small plastic bag with the corner snipped off. Pipe designs onto cookies and let them sit uncovered until the icing hardens completely, about 2 to 4 hours depending on thickness.
Serving Suggestions
- Cookie Decorating Party: Set out plain baked cookies with bowls of icing, sprinkles, candies, and let everyone create their own masterpieces
- Holiday Gift Boxes: Package decorated cookies in clear cellophane bags or festive tins for beautiful homemade gifts
- Gingerbread House Alternative: Use these cookies as walls and roof pieces for easier-to-assemble gingerbread houses
- Hot Beverage Pairing: Serve with hot cocoa, eggnog, spiced cider, or chai tea for the ultimate cozy winter treat
- Dessert Display: Arrange on tiered stands as part of a holiday dessert table or cookie buffet
Storage & Make-Ahead Tips
Room Temperature Storage: Store undecorated or decorated cookies in an airtight container at room temperature for up to 1 week. Place parchment or wax paper between layers to prevent sticking. These cookies actually improve after a day or two as the flavors meld!
Freezing Baked Cookies: Freeze undecorated cookies for up to 3 months. Layer in freezer-safe containers with parchment between layers. Thaw at room temperature for 30 minutes, then decorate. Decorated cookies can also be frozen, though delicate icing may crack—freeze on a tray until solid, then carefully transfer to containers.
Freezing Cookie Dough: This dough freezes beautifully! Wrap tightly in plastic wrap and aluminum foil, or divide into portions. Freeze for up to 3 months. Thaw overnight in the refrigerator before rolling and cutting. You can also roll out the dough, cut shapes, and freeze the cut cookies on a baking sheet. Once solid, transfer to freezer bags and bake directly from frozen, adding 1 to 2 minutes to baking time.
Make-Ahead Instructions: The dough can be made up to 3 days in advance and kept refrigerated. You can also bake the cookies 2 to 3 days ahead and store in airtight containers, decorating them the day before your event. For the ultimate make-ahead strategy, bake and freeze cookies up to a month in advance, then thaw and decorate when needed.
Keeping Cookies Soft: Place a slice of bread in the container with the cookies—they’ll absorb moisture from the bread and stay incredibly soft. Replace the bread slice every few days.
Tips & Tricks
Don’t Skip the Chill Time: The 3-hour minimum chill time is non-negotiable for several reasons: it firms the butter so the dough is easy to roll, allows the flour to fully hydrate for better texture, and gives the spices time to bloom and develop deeper flavor. Overnight chilling is even better!
Roll to Consistent Thickness: Use ¼-inch thickness for the perfect balance of soft texture and structural integrity. Thinner cookies become crispy; thicker cookies may not bake evenly. Consider using rolling pin rings or guides to ensure consistent thickness.
Work Quickly with Warm Dough: If the dough becomes too warm and sticky while rolling, pop it back in the fridge for 10 to 15 minutes. Work in a cool kitchen if possible, and only take out half the dough at a time, keeping the rest chilled.
Common Mistakes to Avoid
- Using blackstrap molasses – It’s too bitter and strong; use dark or robust molasses instead for proper gingerbread flavor
- Skipping or shortening the chill time – Warm dough spreads excessively and won’t hold crisp edges on your cut shapes
- Overbaking – These cookies should look slightly underdone when you remove them; they firm up as they cool
- Rolling dough too thin – Thin cookies become hard and crispy rather than soft and chewy; stick to ¼-inch thickness
- Decorating warm cookies – Icing will melt and run if cookies aren’t completely cool; be patient!
Chef’s Advice
Flavor Variations:
- Add 1 teaspoon of orange zest or lemon zest to the dough for a subtle citrus note
- Increase the ginger to 2 tablespoons for extra-spicy gingerbread
- Add ¼ teaspoon of black pepper for authentic medieval gingerbread flavor with a gentle kick
- Mix ½ cup of finely chopped crystallized ginger into the dough for texture and intense ginger flavor
- Add 1 teaspoon of espresso powder to deepen the molasses flavor
Ingredient Substitutions:
- Dark corn syrup can replace up to half the molasses if you prefer milder flavor
- Honey creates a slightly different but still delicious flavor profile (use ¾ cup honey for 1 cup molasses)
- Whole wheat flour can replace up to 2 cups of the all-purpose flour for nuttier, heartier cookies
- Coconut oil can substitute for butter in a dairy-free version (use solid, room temperature coconut oil)
Decoration Ideas:
- Royal icing (made with egg whites or meringue powder) dries harder and is better for intricate designs
- Flood icing technique creates smooth, professional-looking surfaces
- Use gel food coloring for vibrant colors that don’t thin your icing
- Edible markers work wonderfully for adding details to plain cookies
- Dust with powdered sugar for a simple, elegant snow-dusted look
Professional Tips:
- Re-roll scraps only once to prevent tough cookies from overworked dough
- Bake one sheet at a time on the center rack for most even baking
- Rotate the baking sheet halfway through for uniform browning
- Use a thin metal spatula to transfer delicate cut shapes to baking sheets
History and Cultural Significance
Gingerbread has one of the longest and most fascinating histories in culinary tradition. Ginger was brought to Europe from Asia during ancient times, and early forms of gingerbread date back to ancient Greece and Rome. However, the gingerbread we recognize today evolved in medieval Europe, where honey-sweetened gingerbread was often shaped into elaborate designs and gilded with gold leaf for special occasions.
In medieval England and Germany, professional “gingerbread guilds” controlled the production of gingerbread, which was considered a luxury item. Gingerbread was often sold at fairs and markets, shaped into hearts, animals, and human figures. The tradition of gingerbread men specifically gained popularity in 16th century England, supposedly during the reign of Queen Elizabeth I, who had gingerbread cookies made to resemble visiting dignitaries.
German immigrants brought gingerbread traditions to America, where it became associated with Christmas celebrations. The famous Grimm Brothers’ fairy tale “Hansel and Gretel,” published in 1812, featuring a witch’s house made of gingerbread and candy, further cemented gingerbread’s place in holiday mythology.
The molasses used in American gingerbread came from Caribbean sugar production, making gingerbread an affordable treat by the colonial era. The addition of chemical leaveners like baking soda in the 19th century created lighter, softer gingerbread cookies compared to earlier dense versions.
Today, decorating gingerbread cookies remains a beloved holiday tradition in many cultures. Gingerbread cookie decorating parties, gingerbread house competitions, and elaborate gingerbread displays at hotels and museums keep this ancient tradition alive and evolving.
Final Thoughts
These Perfectly Soft and Chewy Gingerbread Cookies represent everything a gingerbread cookie should be—tender, flavorful, beautifully spiced, and absolutely irresistible. The secret addition of vinegar ensures they stay soft for days, while the generous amount of warm spices creates that classic gingerbread flavor that’s synonymous with holiday celebrations. Whether you’re baking with kids, creating edible gifts, or simply indulging in a beloved tradition, this recipe delivers perfect results every single time.
The beauty of this recipe lies in its reliability and versatility. The dough is forgiving, easy to work with, and holds intricate shapes beautifully. You can keep the decorating simple with a dusting of sugar or go all out with elaborate royal icing designs—either way, you’ll have gorgeous, delicious cookies that taste as good as they look.
So dust off your cookie cutters, put on some holiday music, and fill your kitchen with the warm, spicy aroma of gingerbread. These cookies aren’t just dessert—they’re edible memories, sweet traditions, and pure holiday magic. Here’s to continuing this timeless tradition and creating new memories with every batch!
Nutrition Information
| Serving Size | Calories | Protein | Carbs | Fat | Fiber | Sugar |
|---|---|---|---|---|---|---|
| 1 cookie (based on 36 cookies) | 150 | 2g | 26g | 4g | 0.5g | 14g |
Disclaimer: Nutrition information is estimated using standard online calculation tools and may vary based on ingredients and preparation methods. For accurate dietary advice, consult a qualified nutrition professional.
Course: Cookies, Dessert | Cuisine: American, Holiday | Yield: Approximately 36 cookies (depending on size)