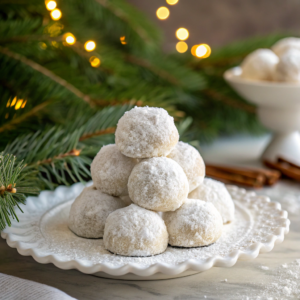
These Snowball cookies are a delightful treat that will warm your heart and satisfy your sweet tooth! Growing up, these were the “magic” cookies of the season. With their rich buttery flavor and a snowy powdered sugar coating, these melt-in-your-mouth confections were a staple at every family gathering. They are so easy to make and fun to share, bringing a sense of festive joy to my household every winter. Whether you’re enjoying them during the holidays or on a cozy afternoon, they promise to bring happiness in every single bite.

Prep Time: 15 min | Cook Time: 12 min | Total Time: 27 min
Key Ingredients
- 1 cup Unsalted Butter: Ensure it is at room temperature for a smooth, creamy texture.
- ½ cup Powdered Sugar: Plus extra for that iconic “snowy” coating.
- 1 tsp Pure Vanilla Extract: High-quality extract makes a world of difference in flavor.
- 2 cups All-Purpose Flour: The base of our cookie structure.
- 1 cup Chopped Nuts: Traditionally pecans or walnuts work best.
- ¼ tsp Salt: To balance the sweetness and enhance the buttery notes.
Step-by-Step Instructions
- Preheat and Prep: Preheat your oven to 350°F (175°C). Line two large baking sheets with parchment paper or silicone baking mats to prevent sticking.
- Cream Butter and Sugar: In a large mixing bowl (or using a stand mixer), cream the softened butter and ½ cup of powdered sugar. Beat for about 3-4 minutes until the mixture is light, pale, and fluffy.
- Add Flavor: Stir in the vanilla extract until fully incorporated.
- Combine Dry Ingredients: Gradually add the flour, salt, and chopped nuts. Pro Tip: Stir gently by hand or on low speed just until the flour disappears—over-mixing can lead to tough cookies!
- Shape the Snowballs: Roll tablespoons of dough into small balls, about 1 inch in diameter. Place them on your prepared baking sheets, leaving about an inch of space between them (they don’t spread much).
- Bake: Bake for 10-12 minutes. You want the edges to be set and the bottoms to be just barely golden. The tops should remain pale.
- The First Roll: Let the cookies cool on a wire rack for exactly 5 minutes. While still warm (but not hot!), roll them in a bowl of extra powdered sugar.
- The Second Roll: Once completely cool, roll them in powdered sugar a second time for that perfect, thick “snowy” look.
Serving Suggestions
- The Cocoa Companion: Serve these alongside a steaming mug of hot chocolate or a peppermint latte.
- Cookie Exchange Platters: Pair them with gingerbread men and thumbprint cookies for a beautiful contrast in textures.
- Gift Jars: Layer these in a glass mason jar with a festive ribbon for a thoughtful homemade gift.
- Afternoon Tea: Serve on a vintage china plate for a sophisticated tea-time snack.
Storage & Make-Ahead Tips
- Refrigeration: Store in an airtight container at room temperature for up to 1 week. Refrigerating isn’t necessary unless your kitchen is very warm, which can melt the sugar coating.
- Freezing: These freeze beautifully! Freeze the baked, sugar-coated cookies in a single layer before transferring to a freezer bag for up to 3 months.
- Make-Ahead: You can prep the dough up to 48 hours in advance. Keep it wrapped tightly in plastic wrap in the fridge, then let it sit at room temperature for 20 minutes before rolling and baking.
Tips & Tricks
- The Double Roll: For the best aesthetic, always roll twice. The first roll creates a “glue” layer as the heat melts the sugar slightly; the second roll provides the fluffy white finish.
- Toast Your Nuts: For a deeper flavor profile, lightly toast your pecans or walnuts in a dry pan for 3-5 minutes before chopping and adding to the dough.
Common Mistakes to Avoid
- Over-baking: If these cookies turn brown on top, they will be dry and crumbly. Take them out as soon as the bottoms show a hint of gold.
- Rolling Too Soon: If you roll the cookies the second they come out of the oven, the sugar will turn into a sticky glaze rather than a powdery coating. Wait those 5 minutes!
Chef’s Advice
- Flavor Variations: Swap vanilla for almond extract for a classic “wedding cookie” taste, or add a teaspoon of orange zest for a citrusy twist.
- Ingredient Substitutions: If you have a nut allergy, you can substitute the nuts with toasted sunflower seeds or simply omit them and add an extra ¼ cup of flour.
- Presentation Ideas: Dust the final platter with a light sifting of extra powdered sugar right before serving to mimic freshly fallen snow.
History and Cultural Significance
Snowball cookies are a global favorite with many names. In the United States, they are often called Mexican Wedding Cookies or Russian Tea Cakes. Regardless of the name, the recipe traditionally traces back to Eastern Europe and the Middle East. They became a staple of American holiday baking in the 20th century, prized for their long shelf life and festive appearance.
Final Thoughts
There is something truly magical about the way a Snowball cookie dissolves on your tongue. They are simple, elegant, and nostalgic. Whether you are a seasoned baker or a beginner, this recipe is virtually foolproof and guaranteed to be the star of your next dessert table. Happy baking!
Nutrition Information
| Serving Size | Calories | Protein | Carbs | Fat | Fiber | Sugar |
| 1 cookie | 100 | <1g | 9g | 7g | <1g | 2g |
Disclaimer: Nutrition information is estimated using standard online calculation tools and may vary based on ingredients and preparation methods. For accurate dietary advice, consult a qualified nutrition professional.
Would you like me to create a Pinterest Pin title and description to go along with this article?